Sometimes it can be useful to flush the DNS cache held on your computer. The DNS cache maintains a local cache of mappings between hostnames and ip addresses. So, if either of those change, for example if you change hosting providers, your local DNS cache can get out of date. The DNS cache will flush itself automatically, but if you need to flush it immediately, open a terminal shell and enter the following:
~ $> dscacheutil -flushcache
This command works on Leopard (10.5) and Snow Leopard (10.6). To flush the cache on Tiger (10.4), open a terminal and execute the following command:
~ $> lookupd -flushcache
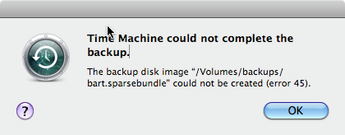
I've recently been attempting to back up my Mac (Snow Leopard) to a network drive but keep getting an error 45 saying that the "Time Machine could not complete the backup".
The problem seems to be that, for some reason, Time Machine cannot create the relevant sparsebundle file on the network drive to allow the backup to be made. The solution is therefore to create the sparsebundle file yourself rather than letting Time Machine create it.
The trick to creating the sparsebundle file is to give it the appropriate name for your computer. The file must be called machinename_macaddress.sparsebundle
To get these pieces of information, open up a terminal shell and type "hostname". This will give you the name of your computer.
~ $> hostname
bart
To get the mac address of your computer, type "ifconfig en0 | grep ether" into a terminal shell.
~ $> ifconfig en0 | grep ether
ether xx:xx:xx:xx:xx:xx (I've replaced the actual values with x's)
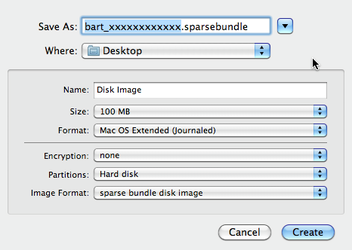
Now that we've got the machine name and the ethernet address, open up Disk Utility and select the button to create a "New Image".
Enter the name of the disk image as machinename_macaddress.sparsebundle and ensure that the Image Format field is set to "sparse bundle disk image" and the Partitions field is set to "Hard disk".
When you've entered the information, press the create button. Depending upon the size of the disk you have created this should take a relatively short time.
Finally, after creating the sparsebundle file, copy it to your network drive, open up Time Machine and select the drive containing the sparsebundle file as the backup drive.
Time Machine should now be able to perform backups to your network drive.
 RSS Feed